Page not found – ShopingServer Wiki http://wiki.shopingserver.com Tutorials and Articles About Technology and Gadgets Sat, 10 Oct 2020 05:51:09 +0000 en-US hourly 1 https://wordpress.org/?v=5.5.14 http://wiki.shopingserver.com/wp-content/uploads/2018/07/cropped-favicon-150x150.png Page not found – ShopingServer Wiki http://wiki.shopingserver.com 32 32 Nearby Share feature introduced for Android; File transfer faster and more secure than ever http://wiki.shopingserver.com/nearby-share-feature-introduced-for-android-file-transfer-faster-and-more-secure-than-ever/ http://wiki.shopingserver.com/nearby-share-feature-introduced-for-android-file-transfer-faster-and-more-secure-than-ever/#respond Sat, 10 Oct 2020 05:51:09 +0000 http://wiki.shopingserver.com/?p=28189 After a long wait, we finally saw the introduction of the NearBy share feature for Android an hour ago. This feature is currently available for a number of Google and Samsung Pixel phones and will soon be available to all Android phones above 6.0.

After a long wait, an hour ago Google finally introduced the Nearby Share feature, which is a competitor to AirDrop, for the Android operating system, and now some users of Pixel and Samsung phones can use this feature to quickly send their files to nearby devices. To use.

This feature is available on Android 6.0 and above for Android users to send files, images, videos, links, etc. to their nearby devices at high speed and with security. 

Using this feature is very simple and in fact a list of devices around you that support Nearby Share is displayed that by selecting one of these devices, you can transfer your data to the device you want.

 Of course, on the recipient side, a notification is displayed that the other party can accept and receive your file. Now the Nearby Share feature will automatically select the best option from the available protocols such as Bluetooth, Bluetooth Low Energy, Peer to Peer Wi-Fi, etc., and even if you are not connected to the Internet.

Ability to share nearby.jpg

In designing this feature, special attention has been paid to privacy so that you can send or receive files anonymously. You can also specify that you hide from certain contacts.

This feature will also be available for Chromebooks in the coming months, so you will soon be able to share your files between Android and Chromebook easily and quickly. So it will be very easy to communicate between Android and Chromebook.

As we said, a number of Google Pixel and Samsung phones are the first Android phones to receive Nearby Share feature from today. But this trend will continue until the coming weeks, and soon all Android phones above 6.0 will benefit from this feature.

Nearby_CHROME.png
]]>
http://wiki.shopingserver.com/nearby-share-feature-introduced-for-android-file-transfer-faster-and-more-secure-than-ever/feed/ 0
How to activate Instagram Dark Mode? http://wiki.shopingserver.com/how-to-activate-instagram-dark-mode/ http://wiki.shopingserver.com/how-to-activate-instagram-dark-mode/#respond Sat, 10 Oct 2020 05:48:06 +0000 http://wiki.shopingserver.com/?p=28185 One of the most useful features of Instagram is the dark theme mode or the dark mode of Instagram. But how to enable this feature in Android and iOS?

Instagram Dark Modeis one of the most popular social networks in the world, which also has many fans in our country. Recently, this social network has been equipped with a feature called Dark Mode. But what is the use of It and how is it activated?

Instagram Dark Mode application

This feature is originally designed with the aim that users who want to use the phone at night and in the dark, not only do not create a lot of light, but also do not damage the eyes due to this light. In fact, this dark theme makes the blue light less harmful.

On the other hand, this feature makes the separation of colors in the Instagram environment, which is full of photos and videos, better.

However, another positive point about activating this feature is that it significantly reduces the phone’s battery consumption. However, we recommend that you use this feature on your phone and on Instagram, which itself consumes a lot of battery.

Activate Instagram Dark Mode on Android

To use this feature on Android phones, you must first make sure you have the latest version of Instagram installed on your phone. Then just follow the steps below:

1- Enter the setting section and tap on the Theme option .

2. Now select the Dark option .

It is simply activated for you.

Activate Instagram Dark Mode on iOS

Keep in mind that you must have at least iOS 13 to enable the Instagram Dark theme on iOS. Also have the latest version of Instagram installed on your phone. Now follow the steps below:

1- On iPhone on Instagram, go to Settings> Display & Brightness .

2- Now you can set the dark mode to ON or OFF.

3- You can also set it to automatic mode to change itself to dark or light depending on the ambient light. Of course, you can also manually program for this mode.

Instagram Dark Mode is easily activated for your iPhone. Of course, iOS itself allows you to generally put the phone in dark mode.

]]>
http://wiki.shopingserver.com/how-to-activate-instagram-dark-mode/feed/ 0
The best free parental control apps for Android, iOS and Windows http://wiki.shopingserver.com/the-best-free-parental-control-apps-for-android-ios-and-windows/ http://wiki.shopingserver.com/the-best-free-parental-control-apps-for-android-ios-and-windows/#respond Fri, 09 Oct 2020 21:49:06 +0000 http://wiki.shopingserver.com/?p=28167 If you are looking for parental control and monitoring programs, get acquainted with the best free parental control programs 2020 in Fisit + download link.

Parental  Control , These days, the Internet has become popular among the general public. Children are no exception and happen to be very interested in using the Internet and tablets.

On the other hand, the Internet and tablets are great tools that help a lot in educating children. Despite all this, the use of the Internet by children and students has increased more than ever due to virtual education.

In addition to these benefits and informative content, the Internet also contains content that is inappropriate for children. Therefore, without parental supervision, children will not be able to use the Internet properly.

This issue was one of the concerns mentioned by the Minister of Communications and Information Technology, Mohammad Javad Azari Jahromi. He wrote on Twitter:

You may have seen parents who, in addition to being happy with their children’s ability to use modern technology, are also concerned about the harms of the Internet to their behavior. Are you familiar with parental monitoring software for children using the Internet?

The answer to this poll was as follows:

  • I know, I use: 8%
  • I have, I have not used yet: 14%
  • No, need to introduce more: 56%
  • I do not find monitoring useful: 22%

However, only 8% of people familiar with parental control tools and programs use these tools. There are also many people who are looking to introduce such programs. Hence Fysyt Stay tuned to the best free programs to introduce parental control 2020.

The best free parental control programs 2020

1- Qustodio

Qustodio is one of the most complete parental control programs that helps you control your child’s cyber activity. Unlike many other apps available only for Windows, it is also available for Android, iOS, Kindle, Nook and Mac .

The free version of Qustodio is a comprehensive parental control program that allows you to set rules and schedules, block inappropriate content for children, and more. If you want to use the paid version of this program, you will have many features such as the ability to monitor text messages and social networks, control programs and games, and location tracking.

The many capabilities of this parental control program, along with support on all platforms, have made Qustodio the best parental control program of 2018.

Download link for Qustodio parental control program

Qustodio_ Parental control software

2- OpenDNS FamilyShield

FamilyShield is a free OpenDNS service whose parental control tool automatically blocks domains that are a subset of inappropriate content (pornography, sex, etc.).

One of the most important strengths of this program is that in addition to being installed on your computer and phone, you can run it on your main router so that your traffic passes through this filter completely. Therefore, by applying a filter at the router level, your entire network is protected. This service can only be used on Windows .

Download the OpenDNS FamilyShield parental control program

OpenDNS – Parental Control Program

3- KidLogger

KidLogger is one of the best parental control programs. This free app not only monitors the websites that children visit and the words they type, the apps that children use, and even the screenshots they take. You can also enable voice recording if you are worried about your children talking. Of course, if your child is a little older and you want to give him more control, you can limit the monitoring options.

The free version of this program, although it has many features, but you will miss some important features in the paid version, features such as imperceptible monitoring of WhatsApp and listening to Skype calls. This software is available for Windows, Mac, Linux, Android and BlackBerry .

Download the KidLogger Parental Control app

4- Spyrix Free Keylogger

We’ve always known Keylogger as a trick to stealing passwords on the Internet. However, in this parental control program, Kilager has been used in a positive direction. In fact, it shows you what your child is typing and what he or she is looking for on the Internet. The free version of this app only shows you what your child is typing but does not stop them from searching. Of course, there is also a paid version of this program that allows you to block inappropriate content. This software can only be used on Windows .

5- Android Monitor, an Iranian application

One of the free Iranian parental control programs is Android Monitor. This program, which is less than 1 MB, has more than 500 active installations so far. Among the features of this program, we can mention the following:

  • Monitor incoming SMS
  • Monitor incoming and outgoing calls
  • For Monitor the installation or removal of applications on the phone
  • Monitoring notifications or announcements of programs such as social networks, etc.
  • Monitor SIM card replacement
  • Ability to receive location from moment to moment
  • And…

Download Android watch application

6- Diligent design; Parental control on the SIM card

Due to the prevalence of Corona and the maximum use of the Internet by children, we are now witnessing the key to diligent design, which by activating it on the SIM card, only provides access to certain websites. This feature is completely free and can be used on Android and iOS phones. So it seems to be the best method right now. Of course, Koosha plan can be activated on Irancell at the moment, but soon other operators will announce how to activate Koosha plan.

Diligent design; A way to control students’ use of the Internet

If you have experience using any of these programs, express your opinions, or if you know of other internal and external programs, share it with us and other Facebook users.

]]>
http://wiki.shopingserver.com/the-best-free-parental-control-apps-for-android-ios-and-windows/feed/ 0
Android – Application components and introduction of additional components http://wiki.shopingserver.com/android-application-components/ http://wiki.shopingserver.com/android-application-components/#respond Fri, 18 Sep 2020 14:01:03 +0000 http://wiki.shopingserver.com/?p=27768 Program Application components are the basic building blocks of an Android application. These components are linked together by the AndroidManifest.xml application manifest file, which describes each component of the application and how they interact.

There are four main components that can be used in an Android application –

Number Component and description
1 Activities- Set the UI and control the user interaction with the smartphone screen.
۲ Services – Control the background processing associated with an application.
3 Broadcast Receivers – Control the connection between the Android operating system and applications.
4 Content Providers – Deal with database and data management issues.

Activities

Activity represents a single screen with a user interface, in short Activity performs on-screen functions. For example, an email application might have an activity that shows a list of new emails, another activity for writing emails, and another activity for reading emails. If the program has more than one activity, one of them must be specified as the activity that is provided when launching the program.

Activity is run as a subclass of the Activity class as follows –

public class MainActivity extends Activity {

}

Services

A service is a component that runs in the background for long-term operations. For example, one service may play music in the background while the user is using another application. Or it may download data over the network without interfering with user activity.

Services is run as a subclass of the Service class as follows –

public class MyService extends Service {

}

Broadcast Receivers

Broadcast Receivers simply respond to messages broadcast from other applications or from the system. For example, applications can start broadcasting so that other applications know that some data has been downloaded to the device and is available for use, so it is the Broadcast Receiver that intercepts this connection and takes appropriate action. .

The Broadcast Receiver is implemented as a subclass of the BroadcastReceiver class, and each message is played as an Intent object.

public class MyReceiver extends BroadcastReceiver {

public void onReceive (context, intent) {

}

Content Provider

The Content Provider component distributes data from one application to another upon request. These requests are handled with ContentResolver class methods. The data may be stored entirely in a file system, database, or other location.

The Content Provider is implemented as a subclass of the ContentProvider class and must run a standard set of APIs to enable other applications to perform transactions.

public class MyContentProvider extends ContentProvider {

public void onCreate () {{

}

Additional components or components

There are other components that are used in the construction of entities, logic and the relationship between them. These components are:

Number Components and descriptions
1 FragmentsShows part of the user interface in an Activity.
۲ ViewsUI elements that include buttons, lists, etc. on the screen.
3 LayoutsView a hierarchy that controls the screen format and appearance of views.
4 IntentsJob request messages from the system.
5 ResourcesExternal elements, such as strings, constants, and printable images.
6 ManifestApplication configuration file.
]]>
http://wiki.shopingserver.com/android-application-components/feed/ 0
Training Content Providers in Android http://wiki.shopingserver.com/training-content-providers-in-android/ http://wiki.shopingserver.com/training-content-providers-in-android/#respond Fri, 18 Sep 2020 10:56:19 +0000 http://wiki.shopingserver.com/?p=27750 A content providers component provides data from one application to another upon request. These requests are handled with ContentResolver class methods. 

Content providers can use a variety of methods to store their data, and data can be stored in databases, files, or even on the network.

Sometimes data needs to be shared in applications. This is where content providers come in handy.

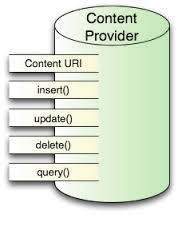
Content providers let you centralize content in one place and have access to different applications if needed. The content provider behaves very much like a database. You can add, update, delete, and query content using the insert (), update (), delete, and query () methods. In most cases this data is stored in a SQlite database.

Content providers are implemented as a subclass of the ContentProvider class and must implement a standard set of APIs that enable other applications to transact.

public class My Application extends ContentProvider {

}

Content providers URIs

To query from the content provider, we specify the query string as URI, which has the following format –

<prefix>: // <authority> / <data_type> / <id>

Here are the details of the different parts of the URI –

Number Description
1 prefixAlways set to content: //.
۲ authoritySpecifies the content provider name, for example contacts, browser, etc. for third-party content providers, this section can have a fully descriptive name, such as com.tutorialspoint.statusprovider
3 data_typeIndicates the type of data provided by the specific content provider. For example, if you get all the contacts from the contacts content provider, the data path will be people and the URI will look like this: content: // contacts / people
4 idThis section specifies the specific record requested. For example, if you are looking for the fifth person contact number in the contact content provider, the URI looks like this: content: // contacts / people / 5

Create  content providers

This section contains some simple steps to create a content provider.

  • First of all you need to create a Content Provider class that extends the ContentProviderbaseclass.
  • Second, you need to define the URL of your content provider that will be used to access the content.
  • Next you need to create your database to preserve the content. Android typically uses a SQLite database, and the framework must use the onCreate () method, which uses the SQLite Open Helper method to create or open a content provider database. Once the application is launched, the onCreate () controller calls each of its content providers in the main application thread.
  • Next you need to implement the Content Provider queries to perform various database operations.
  • Finally, use the <provider> Content Provider tag in your activity file.

Here is a list of methods you should override in the Content Provider class for the Content Provider to work –

C: \ Users \ Mr \ Desktop \ content1.jpg

  • onCreate () This method is called when the provider starts.
  • query () This method receives a request from the client. The result is returned as a cursor object.
  • Insert () This method inserts a new record in the content provider.
  • Delete () This method removes an existing record from the content provider.
  • Update () This method updates the existing record from the content provider.
  • getType () This method returns the MIME type of data in the given URI.

Example

This example illustrates how to create a ContentProvider. So let’s follow the steps below, similar to the ones we followed when creating the Hello World example:

the level

Description

1 You can use Android StudioIDE to create an Android application, called My Application under the com.example.MyApplication package with empty activity.
۲ Modify the MainActivity.java main activity file to add two new methods, ClickAddName () and onClickRetrieveStudents ().
3 Create a new Java file called StudentProvider.java under the com.example.MyApplication package to define your actual provider and related methods.
4 Register your content provider in the AndroidManifest.xml file using the <provider… /> tag
5 Modify the default content of the res / layout / activity_main.xml file to include a small graphical user interface to add student records.
6 No need to change string.xml.Android. Android Studio takes care of the string.xml file.
7 Run the program to launch the Android emulator and see the result of the changes made in the program.

Below is the modified content of the main src / com.example.MyApplication / MainActivity.java activity file. This file can contain any of the basic life cycle methods.

We’ve added two new methods, ClickAddName () and onClickRetrieveStudents () to manage user interaction with the app.

package com.example.MyApplication;

import android.net.Uri;

import android.os.Bundle;

import android.app.Activity;

import android.content.ContentValues;

import android.content.CursorLoader;

import android.database.Cursor;

import android.view.Menu;

import android.view.View;

import android.widget.EditText;

import android.widget.Toast;

public class MainActivity extends Activity {

@Override

protected void onCreate (Bundle savedInstanceState) {

super.onCreate (savedInstanceState);

setContentView (R.layout.activity_main);

}

public void onClickAddName (View view) {

// Add a new student record

ContentValues ​​values ​​= new ContentValues ​​();

values.put (StudentsProvider.NAME,

((EditText) findViewById (R.id.editText2)). GetText (). ToString ());

values.put (StudentsProvider.GRADE,

((EditText) findViewById (R.id.editText3)). GetText (). ToString ());

Uri uri = getContentResolver (). Insert (

StudentsProvider.CONTENT_URI, values);

Toast.makeText (getBaseContext (),

uri.toString (), Toast.LENGTH_LONG) .show ();

}

public void onClickRetrieveStudents (View view) {

// Retrieve student records

String URL = “content: //com.example.MyApplication.StudentsProvider”;

Uri students = Uri.parse (URL);

Cursor c = managedQuery (students, null, null, null, “name”);

if (c.moveToFirst ()) {

do {

Toast.makeText (this,

c.getString (c.getColumnIndex (StudentsProvider._ID)) +

“,” + C.getString (c.getColumnIndex (StudentsProvider.NAME)) +

“,” + C.getString (c.getColumnIndex (StudentsProvider.GRADE)),

Toast.LENGTH_SHORT) .show ();

} while (c.moveToNext ());

}

}

}

Create a new StudentProvider.java file under the com.example.MyApplication package. Below is the content of src / com.example.MyApplication / StudentProvider.java-

package com.example.MyApplication;

import java.util.HashMap;

import android.content.ContentProvider;

import android.content.ContentUris;

import android.content.ContentValues;

import android.content.Context;

import android.content.UriMatcher;

import android.database.Cursor;

import android.database.SQLException;

import android.database.sqlite.SQLiteDatabase;

import android.database.sqlite.SQLiteOpenHelper;

import android.database.sqlite.SQLiteQueryBuilder;

import android.net.Uri;

import android.text.TextUtils;

public class StudentsProvider extends ContentProvider {

static final String PROVIDER_NAME = “com.example.MyApplication.StudentsProvider”;

static final String URL = “content: //” + PROVIDER_NAME + “/ students”;

static final Uri CONTENT_URI = Uri.parse (URL);

static final String _ID = “_id”;

static final String NAME = “name”;

static final String GRADE = “grade”;

private static HashMap <String, String> STUDENTS_PROJECTION_MAP;

static final int STUDENTS = 1;

static final int STUDENT_ID = 2;

static final UriMatcher uriMatcher;

static {

uriMatcher = new UriMatcher (UriMatcher.NO_MATCH);

uriMatcher.addURI (PROVIDER_NAME, “students”, STUDENTS);

uriMatcher.addURI (PROVIDER_NAME, “students / #”, STUDENT_ID);

}

/ **

* Database specific constant declarations

* /

private SQLiteDatabase db;

static final String DATABASE_NAME = “College”;

static final String STUDENTS_TABLE_NAME = “students”;

static final int DATABASE_VERSION = 1;

static final String CREATE_DB_TABLE =

”CREATE TABLE” + STUDENTS_TABLE_NAME +

”(_Id INTEGER PRIMARY KEY AUTOINCREMENT,” +

”Name TEXT NOT NULL,” +

”Grade TEXT NOT NULL);”;

/ **

* Helper class that actually creates and manages

* the provider’s underlying data repository.

* /

private static class DatabaseHelper extends SQLiteOpenHelper {

DatabaseHelper (Context context) {

super (context, DATABASE_NAME, null, DATABASE_VERSION);

}

@Override

public void onCreate (SQLiteDatabase db) {

db.execSQL (CREATE_DB_TABLE);

}

@Override

public void onUpgrade (SQLiteDatabase db, int oldVersion, int newVersion) {

db.execSQL (“DROP TABLE IF EXISTS” + STUDENTS_TABLE_NAME);

onCreate (db);

}

}

@Override

public boolean onCreate () {

Context context = getContext ();

DatabaseHelper dbHelper = new DatabaseHelper (context);

/ **

* Create a write able database which will trigger its

* creation if it does not already exist.

* /

db = dbHelper.getWritableDatabase ();

return (db == null)? false: true;

}

@Override

public Uri insert (Uri uri, ContentValues ​​values) {

/ **

* Add a new student record

* /

long rowID = db.insert (STUDENTS_TABLE_NAME, “”, values);

/ **

* If record is added successfully

* /

if (rowID> 0) {

Uri _uri = ContentUris.withAppendedId (CONTENT_URI, rowID);

getContext (). getContentResolver (). notifyChange (_uri, null);

return _uri;

}

throw new SQLException (“Failed to add a record into” + uri);

}

@Override

public Cursor query (Uri uri, String [] projection,

String selection, String [] selectionArgs, String sortOrder) {

SQLiteQueryBuilder qb = new SQLiteQueryBuilder ();

qb.setTables (STUDENTS_TABLE_NAME);

switch (uriMatcher.match (uri)) {

case STUDENTS:

qb.setProjectionMap (STUDENTS_PROJECTION_MAP);

break;

case STUDENT_ID:

qb.appendWhere (_ID + “=” + uri.getPathSegments (). get (1));

break;

default:

}

if (sortOrder == null || sortOrder == “”) {

/ **

* By default sort on student names

* /

sortOrder = NAME;

}

Cursor c = qb.query (db, projection, selection,

selectionArgs, null, null, sortOrder);

/ **

* register to watch a content URI for changes

* /

c.setNotificationUri (getContext (). getContentResolver (), uri);

return c;

}

@Override

public int delete (Uri uri, String selection, String [] selectionArgs) {

int count = 0;

switch (uriMatcher.match (uri)) {

case STUDENTS:

count = db.delete (STUDENTS_TABLE_NAME, selection, selectionArgs);

break;

case STUDENT_ID:

String id = uri.getPathSegments (). Get (1);

count = db.delete (STUDENTS_TABLE_NAME, _ID + ”=” + id +

(! TextUtils.isEmpty (selection)? “

AND (”+ selection + ‘)’:“ ”), selectionArgs);

break;

default:

throw new IllegalArgumentException (“Unknown URI” + uri);

}

getContext (). getContentResolver (). notifyChange (uri, null);

return count;

}

@Override

public int update (Uri uri, ContentValues ​​values,

String selection, String [] selectionArgs) {

int count = 0;

switch (uriMatcher.match (uri)) {

case STUDENTS:

count = db.update (STUDENTS_TABLE_NAME, values, selection, selectionArgs);

break;

case STUDENT_ID:

count = db.update (STUDENTS_TABLE_NAME, values,

_ID + ”=” + uri.getPathSegments (). Get (1) +

(! TextUtils.isEmpty (selection)? “

AND (”+ selection + ‘)’:“ ”), selectionArgs);

break;

default:

throw new IllegalArgumentException (“Unknown URI” + uri);

}

getContext (). getContentResolver (). notifyChange (uri, null);

return count;

}

@Override

public String getType (Uri uri) {

switch (uriMatcher.match (uri)) {

/ **

* Get all student records

* /

case STUDENTS:

return “vnd.android.cursor.dir / vnd.example.students”;

/ **

* Get a particular student

* /

case STUDENT_ID:

return “vnd.android.cursor.item / vnd.example.students”;

default:

throw new IllegalArgumentException (“Unsupported URI:” + uri);

}

}

}

Below you will find the modified content in the AndroidManifest.xml file. Here we have added the <provider… /> tag to include our content provider:

<? xml version = ”1.0 ″ encoding =” utf-8 ″?>

<manifest xmlns: android = ”http://schemas.android.com/apk/res/android”

package = ”com.example.MyApplication”>

<application

android: allowBackup = ”true”

android: icon = ”@ mipmap / ic_launcher”

android: label = ”@ string / app_name”

android: supportsRtl = ”true”

android: theme = ”@ style / AppTheme”>

<activity android: name = ”. MainActivity”>

<intent-filter>

<action android: name = ”android.intent.action.MAIN” />

<category android: name = ”android.intent.category.LAUNCHER” />

</intent-filter>

</activity>

<provider android: name = ”StudentsProvider”

android: authorities = ”com.example.MyApplication.StudentsProvider” />

</application>

</manifest>

Below is the content of the res / layout / activity_main.xml file_

<? xml version = ”1.0 ″ encoding =” utf-8 ″?>

<RelativeLayout xmlns: android = ”http://schemas.android.com/apk/res/android”

xmlns: tools = ”http://schemas.android.com/tools”

android: layout_width = ”match_parent”

android: layout_height = ”match_parent”

android: paddingBottom = ”@ dimen / activity_vertical_margin”

android: paddingLeft = ”@ dimen / activity_horizontal_margin”

android: paddingRight = ”@ dimen / activity_horizontal_margin”

android: paddingTop = ”@ dimen / activity_vertical_margin”

tools: context = ”com.example.MyApplication.MainActivity”>

<TextView

android: id = ”@ + id / textView1 ″

android: layout_width = ”wrap_content”

android: layout_height = ”wrap_content”

android: text = ”Content provider”

android: layout_alignParentTop = ”true”

android: layout_centerHorizontal = ”true”

android: textSize = ”30dp” />

<TextView

android: id = ”@ + id / textView2 ″

android: layout_width = ”wrap_content”

android: layout_height = ”wrap_content”

android: text = ”Tutorials point“

android: textColor = ”# ff87ff09 ″

android: textSize = ”30dp”

android: layout_below = ”@ + id / textView1 ″

android: layout_centerHorizontal = ”true” />

<ImageButton

android: layout_width = ”wrap_content”

android: layout_height = ”wrap_content”

android: id = ”@ + id / imageButton”

android: src = ”@ drawable / abc”

android: layout_below = ”@ + id / textView2 ″

android: layout_centerHorizontal = ”true” />

<Button

android: layout_width = ”wrap_content”

android: layout_height = ”wrap_content”

android: id = ”@ + id / button2 ″

android: text = ”Add Name”

android: layout_below = ”@ + id / editText3 ″

android: layout_alignRight = ”@ + id / textView2 ″

android: layout_alignEnd = ”@ + id / textView2 ″

android: layout_alignLeft = ”@ + id / textView2 ″

android: layout_alignStart = ”@ + id / textView2 ″

android: onClick = ”onClickAddName” />

<EditText

android: layout_width = ”wrap_content”

android: layout_height = ”wrap_content”

android: id = ”@ + id / editText”

android: layout_below = ”@ + id / imageButton”

android: layout_alignRight = ”@ + id / imageButton”

android: layout_alignEnd = ”@ + id / imageButton” />

<EditText

android: layout_width = ”wrap_content”

android: layout_height = ”wrap_content”

android: id = ”@ + id / editText2 ″

android: layout_alignTop = ”@ + id / editText”

android: layout_alignLeft = ”@ + id / textView1 ″

android: layout_alignStart = ”@ + id / textView1 ″

android: layout_alignRight = ”@ + id / textView1 ″

android: layout_alignEnd = ”@ + id / textView1 ″

android: hint = ”Name”

android: textColorHint = ”@ android: color / holo_blue_light” />

<EditText

android: layout_width = ”wrap_content”

android: layout_height = ”wrap_content”

android: id = ”@ + id / editText3 ″

android: layout_below = ”@ + id / editText”

android: layout_alignLeft = ”@ + id / editText2 ″

android: layout_alignStart = ”@ + id / editText2 ″

android: layout_alignRight = ”@ + id / editText2 ″

android: layout_alignEnd = ”@ + id / editText2 ″

android: hint = ”Grade”

android: textColorHint = ”@ android: color / holo_blue_bright” />

<Button

android: layout_width = ”wrap_content”

android: layout_height = ”wrap_content”

android: text = ”Retrive student”

android: id = ”@ + id / button”

android: layout_below = ”@ + id / button2 ″

android: layout_alignRight = ”@ + id / editText3 ″

android: layout_alignEnd = ”@ + id / editText3 ″

android: layout_alignLeft = ”@ + id / button2 ″

android: layout_alignStart = ”@ + id / button2 ″

android: onClick = ”onClickRetrieveStudents” />

</RelativeLayout>

Make sure the contents of the res / values ​​/ strings.xml file are as follows:

<? xml version = ”1.0 ″ encoding =” utf-8 ″?>

<resources>

<string name = ”app_name”> My Application </string>

</resources>;

We are now running the program. Let’s say you created your AVD while making environmental settings. To run the program from Android Studio IDE, open one of your project activity files and from the toolbar, click on the Run Android StudioRun Icon icon. Android Studio installs the program on your AVD and launches it.

If everything is correct, the Emulator window will appear below, if it took longer wait –

C: \ Users \ Mr \ Desktop \ content2.jpg

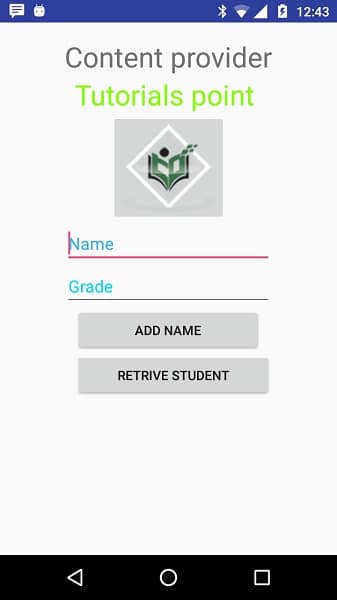
Now let’s fill in the Student Name and Grade and finally click on the Add Name button, this will add the student record to the database and a message will appear at the bottom that adds the ContentProvider URI along with the added record number. Adds to the database. This operation uses the insert () method. Repeat the process to add other students to the content provider database.

C: \ Users \ Mr \ Desktop \ content3.jpg

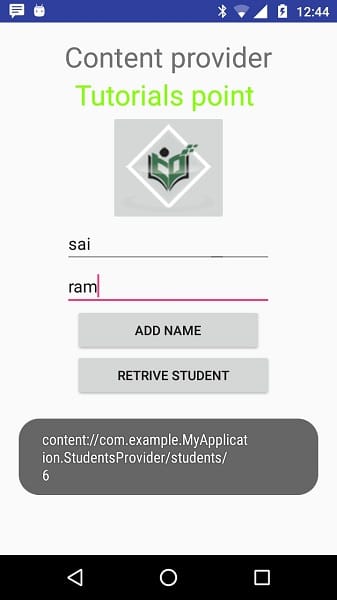
Once you’ve done your job of adding a record to the database, now is the time to ask ContentProvider to return those records to us, so click on the Retrieve Student button to fetch all the records. This is done according to the query () method we wrote.

You can write activities to update and delete programs by providing callback functions in the MainActivity.java file, and then change the user interface to add buttons for update and delete in the same way we did for add and read operations. , add.

This way you can use an existing content provider such as Content Book or you can use the concept of content provider in the development of database-based applications. You can use a variety of database functions such as read, write, update and delete as described in the example.

]]>
http://wiki.shopingserver.com/training-content-providers-in-android/feed/ 0
Tips for Android app development: the result of my experiences http://wiki.shopingserver.com/tips-for-android-app-development-the-result-of-my-experiences/ http://wiki.shopingserver.com/tips-for-android-app-development-the-result-of-my-experiences/#respond Thu, 10 Sep 2020 19:04:36 +0000 http://wiki.shopingserver.com/?p=27701 Today, Android is available not only on mobile phones, but also on the wrist, bedroom, car and almost anywhere in the world. Due to the increasing progress in the field of Android, developers should always keep themselves up to date. 

Here are some tips to help you program and create a successful Android app.

Lesson 1: Learning from failure

Remember that success does not come overnight. You may make plans, but you will not succeed in attracting the audience, do not despair and learn from your failure. Try to consider human needs in your ideas for planning. Be creative and create attractive, challenging and fun programs.

Lesson 2: Knowing the Android Market

Android has a bigger market than iOS, but iOS audiences spend more. Messenger apps are very popular, but at the top of the list of downloaded apps are free games. China, India, Brazil and Russia are the top customers of Android apps. However, we want to talk about a background image app (app) that has sold very well and outline the points needed to create it. The first point is that live wallpapers are very popular. The second point is that your app has low Android (like 2.1) so you can expand your target community.

You should note that most of the live wallpapers offered are weather-related. That’s why you have to look for something different, something that makes the audience laugh. Creating customization can increase the popularity of your background. What we built was very successful,

It has the following features:

  • 12 different osh to choose from
  • Free and purchasable content
  • Update weather conditions
  • Data synchronization
  • Seasonal characteristics
  • Lots of surprises
  • Ninja Cat

What programming language should we use to create and develop Android applications?

Lesson 3: Practice

Oshi is an interesting idea for Android. Draw a background, draw some clouds and stars and a bear inside the balloon at the top. Although this seems easy, it is very difficult to run on Android. Here are some problems you may encounter:

  1. Hardware Acceleration: Using a GPU for better design is better than using a CPU, but this reduces hardware acceleration.
  2. OpenGL: If you are looking for hardware acceleration, you should use OpenGL ES.
  3. Loading bitmap: This is a matter of memory space. You must allocate 1 byte of memory for each #ARGB channel to display one pixel.
  4. Battery charge: If you are not doing well, live widgets and wallpapers will drain the battery quickly. To have an animated background image, you must use a tool called parallax effect.

See how a frame of the program is drawn:

canvas.drawBitmap (background, 0 – offsetX / 4, 0, null);

canvas.drawBitmap (weatherOverlay, 0 – offsetX / 2, 0, null);

if (! validDoubleTap) {

canvas.drawBitmap (ooshieNormal, positionX – offsetX, positionY, null);

}

else {

canvas.drawBitmap (ooshieTapped, positionX – offsetX, positionY, null);

}

Here offset is the percentage of distance that the user scrolls, and is actually a callback generated by the wallpaper engine:

@Override

public void onOffsetsChanged (float xOffset, float yOffset, float xOffsetStep, float yOffsetStep,

int xPixelOffset, int yPixelOffset) {

super.onOffsetsChanged (xOffset, yOffset, xOffsetStep, yOffsetStep, xPixelOffset, yPixelOffset);

// athe current offset should be a fraction of the screen offset to achieve parallax

if (! isPreview ()) {

float newXOffset = xOffset * 0.15f;

wallpaperDrawHelper.setOffsetX (newXOffset);

if (isVisible () && hasActiveSurface) {

wallpaperDrawHelper.drawFrame (false);

}

}

}

Lesson 4: Work with what you have

Controlling the bits will have a huge impact on our end result. Instead of designing three bits, parallax effect can be achieved by designing two bits:

  • Oshi Cover: Accurate correction and scaling of Oshi bitumen
  • Combined Coverage: A combination of background and weather bitumps that travel at a fraction of the Oshi speed.
  • This saves memory space and speeds up your design.
  • Note the following points for bitcoin pumping and memory optimization:
  • Combine the bitcoins once
  • Design fewer bits
  • Redesign only if necessary
  • Provide the consumer with several control options

Tips for improving the coding of Android applications

Lesson 5: Trying, trying

It is very, very important that you do not publish your application before testing your application. You are the author of the code and by examining it you can understand how to improve it. It is best to do an alpha and beta test before releasing your app.

Alpha Test: Give your program to some teammates or knowledgeable people and ask them to check for weaknesses and bugs.

Beta test: At this stage, make your program available to a wider range and examine the feedback of these people.

Lesson 6: Let the data speak

Building a good app is great because you need to be able to get positive feedback from your audience. The program may be ideal for one person but another person may have a different opinion. That’s why you need to upgrade your program regularly. For this purpose, you can use the following options:

  • voices
  • Seasonal backgrounds
  • Privatization (background color, weather packages, Oshi shell)
  • Regional special items
  • Lots of objects and specify how to open them

At this stage, you should put your program in beta and check the feedback of your users. You can also use some Google features like Mixpanel, Acra, Flurry and more.

]]>
http://wiki.shopingserver.com/tips-for-android-app-development-the-result-of-my-experiences/feed/ 0
List of all Android Studio application shortcuts http://wiki.shopingserver.com/list-of-all-android-studio-application-shortcuts/ http://wiki.shopingserver.com/list-of-all-android-studio-application-shortcuts/#respond Thu, 10 Sep 2020 18:49:05 +0000 http://wiki.shopingserver.com/?p=27695 In this article, we provide you with practical shortcut keys for working faster with Android Studio and easier programming in the form of a table.

Keyboard shortcuts

Description Windows / Linux Mac
General
to save Control + s Command (s) + s
Sync Control + penis + y Command + option + y
Maximum / Minimize Editor Control + Shift + F12 Control + Command + F12
Add to favorites Penis + Shift + F. Option + Shift + F.
Check the file Penis + Shift + i Option + Shift + i
Open Settings Control + penis + s Command +,
Open the project structure Control + Penis + Shift + s Command + dot comma
Search in the studio
Searching for anything Pressing shift twice Pressing shift twice
to find Control + f Command + f
Find out next F3 Command + g
Find previous Shift + f3 Command + Shift + g
Replace Control + r Command + r
Symbol Search Control + Penis + Shift + n Command + option + o
Find a class Control + n Command + o
Find the file Control + Shift + n Command + Shift + o
Finding along the way Control + Shift + f Command + Shift + f
Jump to source F4 / control + Inter F4 / command + down direction
Open the editor in a new window Shift + f4 Shift + f4
Recently opened files Control + e Command + e
Recently edited files Control + Shift + e Command + Shift + e
Close the active editor bar Control + f4 Command + w
Return to the Edit window from the Tools window Esc Esc
Hide active tool window Shift + Skip (Esc) Shift + Skip (Esc)
Go to the line Control + g Command + L
size change
Zoom in or out Control + (+ or-) Command + (+ or-)
The same size as the screen Control + zero Command + zero
Actual size Control + Shift + 1 Command + Shift + 1
Design tools: layout
Connection between design and blueprint B B
Connection between image and landscape O O
Connecting devices D D
Compulsory refresh R R
Remove constraints Delete (Delete) Delete (Delete)
Zoom in Control + (+) Command + (+)
Miniaturize Control + (-) Command + (-)
Zoom in full screen Control + o Command + o
Go to XML Control + B Command + B
Select all components Control + A Command + A
Select multiple components Shift + click Shift + click
Design tool: route determination
Zoom in Control + (+) Command + (+)
Miniaturize Control + (-) Command + (-)
Zoom in full screen Control + o کماند + o
Go to XML Control + B Command + B
Create cycles between destinations Shift + fever Shift + Tab
Select all components Control + A Command + A
Select multiple components Shift + click Shift + click
coding
Generate code Penis + insert Command + N
Cancel methods Control + O Control + O
Applying methods Control + i Control + i
Delete the line in the hashtag Control + y Command + backspace
Eliminate or expand code Control + (+ or-) Command + (+ or-)
Eliminate or expand all code Control + Shift + (+ or-) Command + Shift + (+ or-)
Copy from selected line Control + d Command + d
Complete the code Control + distance (space) Control + distance
Complete smart code Control + Shift + Distance Control + Shift + Distance
Complete the sentence Control + Shift + Inter Command + Shift + Inter
Show the parameters of the selected method Control + p Command + p
Go to notifications (straight) Control + click Command + Click
Going to performances Control + Penis + b Command + Penis + b
Go to Supermodel Control + u command+ u
Bookmark connection (sign) F11 F3
Connecting the sign with the monmonic Control + f11 Option + f3
Navigate to the beginning of the code Control + [ Options + Command + [
Navigate to the end of the code Control +] Option + Command +]
Select the beginning of the code Control + Shift + [ Option + Command + Shift + [
Select the end of the code Control + Shift +] Option + Command + Shift +]
Remove from end of word Control + data Options + Delity
Remove from the beginning of the word Control + back space Option + backspace
Optimization of inputs (imports) Control + penis + o Control + option + o
Quick fix of project problems Alt + Inter Option + Inter
Reformat the code Control + Penis + L Command + option + L
Auto highlight lines Control + Penis + I Control + Option + I
Highlight / non-highlight lines Shift + fever Shift + fever
Smart line connection Control + Shift + J Control + Shift + J
Intelligent line separation Control + Inter Command + Inter
The beginning of a new line Shift + Inter Shift + Inter
Specify previous / next error F2 F2
Create and run
Creation Control + F9 Command + F9
Create and run Shift + F10 Control + R
Make changes and restart the activity Control + F10 Control + Command + R
Apply code changes Control + Penis + F10 Control + Shift + Command + R
Debugging
Debugging Shift + F9 Control + D
Reference to the cursor Alt + F9 Option + F9
Expression evaluation Alt + F8 Option + F8
Continue the program F9 Command + option + R
Connecting breakpoints Control + F8 Command + F8
View breakpoints Control + Shift + F8 Command + Shift + F8
Rebuilding
Copy F5 F5
moving F6 F6
Safe removal alt+ delete Command + Delit
Resign Shift + F6 Shift + F6
Change the sign Control + F6 Command + F6
Extraction method Control + Penis + M Command + Option + M
Variable extraction Control + Penis + V Command + option + V
Extract field Control + Penis + F Command + option + F
Fixed extraction Control + Penis + C Command + option + C
Parameter extraction Control + Penis + P Command + option + P
Version control (version)
Project transfer to VCS Control + K Command + K
Project update by VCS Control + T Command + T
See recent changes Penis + Shift + C Option + Shift + C
Open VCS popup alt+ ̓ Control + v
]]>
http://wiki.shopingserver.com/list-of-all-android-studio-application-shortcuts/feed/ 0
What is Android? Features, history and basic acquaintance with its programming language http://wiki.shopingserver.com/what-is-android-features-history-and-basic-acquaintance-with-its-programming-language/ http://wiki.shopingserver.com/what-is-android-features-history-and-basic-acquaintance-with-its-programming-language/#respond Thu, 10 Sep 2020 18:43:29 +0000 http://wiki.shopingserver.com/?p=27691 Android is an open source Linux-based operating system for mobile devices such as smartphones and tablets. Android was developed by the Open Handset Alliance with the help of Google and other companies.

The Android offers an integrated approach to developing applications for mobile devices, meaning developers only need to develop for Android, and their applications must be able to run on a variety of devices running Android.

The first beta version of the Android Software Development Kit (SDK) was released by Google in 2007, and the first commercial version, Android 1.0, was released in September 2008.

On June 27, 2012, at the Google I / O conference, Google released its next Android version, 4.1 Jelly Bean. Jelly Bean is an incremental update that aims to improve the user interface, both in terms of performance and performance.

Android source code is available under free and open source software licenses. Google releases most of the code under the Apache version 2.0 license, and the rest, the Linux kernel changes, under the general GNU version 2 license.

Why Android?

Android features

Android is a powerful operating system that competes with the Apple 4GS and supports great features. A few of its features are listed below –

Number Features and descriptions
1 Beautiful user interfaceAndroid home screen offers a beautiful and intuitive user interface.
۲ ConnectionGSM / EDGE, IDEN, CDMA, EV-DO, UMTS, Wi-Fi, LTE, NFC Bluetooth and WiMAX.
3 saveSQLite, a lightweight relational database, is used for data storage purposes.
4 Media supportH.263, H.264, MPEG-4 SP, AMR, AMR-WB, AAC, HE-AAC, AAC 5.1, MP3, MIDI, Ogg Vorbis, WAV, JPEG, PNG, GIF, and BMP.
5 messagingSMS and MMS
6 Web browserBased on the open source WebKit engine, along with the V8 JavaScript Chrome engine that supports HTML5 and CSS3.
7 Multi-touchAndroid has native multi-touch support that was initially available on phones like the HTC Hero.
8 MultitaskThe user can jump from one task to another and different programs can be run at the same time.
9 Customizable widgetsWidgets are customizable, so users can expand them to display more content or shrink them to save space.
10 multilanguageSupports one-way and two-way text.
۱۱ GCMGoogle Cloud Messaging (GCM) is a service that allows developers to send short message data to users of Android devices without the need for a dedicated synchronization solution.
۱۲ Wi-Fi DirectTechnology that allows applications to be paired directly through a high-bandwidth peer-to-peer connection.
13 Android BeamNFC-based technology that lets you share data with just the touch of two NFC-enabled phones.

Android apps

Android applications are usually developed in Java using the Android software development kit.

Once developed, Android apps can be easily packaged or sold through stores such as Google Play, SlideME, Opera Mobile Store, Mobango, F-droid and Amazon Appstore.

Android supports hundreds of millions of mobile devices in more than 190 countries around the world. It is the largest mobile platform platform and is growing rapidly. Every day, more than 1 million new Android devices are activated worldwide.

Category Android apps

There are many Android apps on the market. The top categories are shown in the image below.

C: \ Users \ Mr \ Desktop \ categories.jpg

History of Android

Android code names are currently rated from A to N, such as Aestro, Blender, Cupcake, Donut, Eclair, Froyo, Gingerbread, Honeycomb, Ice Cream Sandwitch, Jelly Bean, KitKat, Lollipop and Marshmallow.

C: \ Users \ Mr \ Desktop \ jistory.jpg

What is the API level?

The API level is an integer that separately specifies the API revision framework provided by a version of the Android platform.


]]>
http://wiki.shopingserver.com/what-is-android-features-history-and-basic-acquaintance-with-its-programming-language/feed/ 0
How much money can you really make from YouTube ?! http://wiki.shopingserver.com/how-much-money-can-you-really-make-from-youtube/ http://wiki.shopingserver.com/how-much-money-can-you-really-make-from-youtube/#respond Fri, 04 Sep 2020 18:43:56 +0000 http://wiki.shopingserver.com/?p=27582

We go to YouTube and search for something and see that someone is sitting at the opportunity and making a 10 minute video to answer that question.

For example, he compared two flagship phones. When we look at the video, we see that it has a professional cinematography and it is obvious that the camera, lighting, editing and applying professional effects and moving text on the video have been used.

We guess it took at least a few days to produce this video. OK! The paycheck was taken by YouTube video content producer, or YouTube, and its video appeared on the first page of the search and received thousands of views.

But what could be the user’s financial incentive? Is he making a profit on the rest of his co-workers for all this time and investment and possibly a substantial salary?

YouTubeCan we also make videos in the current situation in Iran and receive money from Google?

Since I have no experience, I will only draw your attention to the answer of one of the YouTubers:

Our YouTube video content maker Shelby Church is a young lady. He started making videos for YouTube in 2009. That is, when YouTube was not yet a giant.

Ms. Shelby was only 14 years old when she was posting, mostly for entertainment and to see her videos being watched and commented on by many people.

For years, he did not receive any special money from YouTube. Until 10 years ago the situation changed. At that time, some Shelby videos had already reached one million views.

At this time, Shelby’s entourage, who knew he was active on YouTube, from his Uber driver to close and distant friends and family members, asked him how much he really earned on YouTube.

Well, their curiosity cannot be blamed. This is the question that every writer, blogger, Instagram or YouTube activist is asked.

Usually, in my personal experience, people are sometimes alienated from personal love and affection and can not understand that the initial motivation of many users is only internal and spiritual, and of course all these people if money comes out of love, a They also find shell satisfaction.

Now we come to Ms. Shelby’s main answer:

YouTube allocates a portion of its revenue to producers for displaying ads and promoting ads and links. As you know, we usually have to endure a 15 to 30 second ad before playing videos. Then we can watch the video for a few minutes and after that we usually have another intermediate ad.

Additionally, text ads may be displayed below the videos.

This is how YouTube makes money, and from there, it gives money to YouTube users.

Example 1: Video on how to take pictures in figures

Well, here Ms. Shelby has found a good topic for making the video. If you do a Google search, you will find dozens of good text articles about it. However, the gender of the subject is such that we usually watch the video, it is easier to understand its points and we are guided better in the form of video.

Video made by Ms. Shelby; It has 3,900,000 viewers and it has received $ 1275 for this amount of views or views.

OK! Do not pull out the calculator too soon. Work is not simply multiplication and division. This does not mean that if the viewing of another video is lower or higher than this video, the revenue will simply be lower or higher.

Ms. Shelby estimates that the average revenue for every 3 million hits is between $ 6,000 and $ 15,000.

Do not get too excited, as I said, work is not simply multiplication and division. For example, the same Ms. Shelby had a high-profile video that brought her very little money. Why?!

Because this particular video has been seen mostly by users outside the US and as a result has not been able to attract advertisers. The video was actually popular because YouTube algorithms showed it to people other than Shelby regular subscribers in India, the Philippines, Pakistan and Nepal. These countries all have much lower CPM rates or revenue per visit than the United States, Australia and Canada.

If your video is viewed by American users, you earn about $ 4 per thousand views. If you have only $ 1.16 per thousand Indian user visits. YouTube is up 45 percent. So every thousand visits of Indian users cost only 58 cents!

Ms. Shelby, on the other hand, made another video about the features of the Tesla Model 3, which received about 2 million views. But he got the same 2 million views; He earned $ 11,500.

This video was 10 minutes long, and because it was the right length, there was a mid-program ad in the middle of the video, so it increased the revenue so much, and as you can see, the subject of the video is that it is mostly viewed in the US and Canada. had. The CPM of this video was about $ 11!

In general and introductory to the question of the title of this post can be said:

1. It depends on how subjective you are

2. What is the skill of cultivating the subject and the type of your video presentation?

3. How technically proficient are you, either in making videos or presenting videos on YouTube?

4- How many raw visits do you get?

5. Which geographical area have you visited from users of this visit?


For a global user, YouTube can be a good source of revenue.

In this post, I just wanted to start the topic with a new excuse. Among Iranian users, there are those who professionally and committedly intend to use YouTube. In other words, we have to talk about what it costs to become a YouTube user.

]]>
http://wiki.shopingserver.com/how-much-money-can-you-really-make-from-youtube/feed/ 0
ScreenHive, This app regularly reminds you when you are on the phone, but think about time management! http://wiki.shopingserver.com/screenhive-this-app-regularly-reminds-you-when-you-are-on-the-phone-but-think-about-time-management-this-app-regularly-reminds-you-when-you-are-on-the-phone/ http://wiki.shopingserver.com/screenhive-this-app-regularly-reminds-you-when-you-are-on-the-phone-but-think-about-time-management-this-app-regularly-reminds-you-when-you-are-on-the-phone/#respond Fri, 04 Sep 2020 18:37:29 +0000 http://wiki.shopingserver.com/?p=27579

This app regularly reminds you when you are on the phone, but think about time management!


Apple and Google have introduced digital wellbeing apps and policies to reduce phone usage time among users, especially young people.

You can view and limit the amount of time spent on the phone, the Internet, or any of the other new versions on Android and iOS.

Smartphone addiction reduction policies by Apple and Google are not limited to their own devices,

and they also have extensive support for third-party tools and applications for better and more creative management of time spent on the phone.

For this reason, we see a lot of apps for managing and controlling work with phones and apps on both Google Play and App Store.

Recently, Google Play has released a simple but very creative and functional application for Android phones called ScreenHive.

ScreenHive is a new digital wellbeing app that constantly alerts you to the elapsed time by displaying a timer or timer on the screen as a widget.

You are in any situation; In any part or program of the phone, this widget timer is on the screen of your progress,

and you constantly have to look at the duration of work with the phone to be gradually convinced to leave the smartphone.

The digital wellbeing program is flexible. You can place the timer anywhere on the screen so that it does not interfere with your work. You can either not turn on the timer at all on some days or stop it to relax.

It does not interfere with the work of mobile phones and other apps at all, and you can watch it on any application,

even games and social networks. It is lightweight and does not require a lot of memory or system resources, but instead you can see at a glance how much you used the phone today.

Download the ScreenHive app for Android devices from Google Play . This app works on Android 5 and above.

]]>
http://wiki.shopingserver.com/screenhive-this-app-regularly-reminds-you-when-you-are-on-the-phone-but-think-about-time-management-this-app-regularly-reminds-you-when-you-are-on-the-phone/feed/ 0